April 13, 2026
ScaleStop Water Conditioning vs Water Softeners
Your questions answered on the top 2 methods of hard water t...

The Basics of Ultraviolet (UV) Disinfection
 UV disinfection is not new!
Disinfection with sunlight has been recognised for centuries. The germicidal properties of sunlight were demonstrated by Downes and Blunt in 1877. Once it was understood that specific UV-C wavelengths are responsible for this germicidal activity, the technology was developed so that UV light could be used in a controlled and meaningful way. Today, UV Systems are used extensively across Australia providing reliable disinfection for potable water, process water and healthcare water supplies.
UV technology is easy to explain
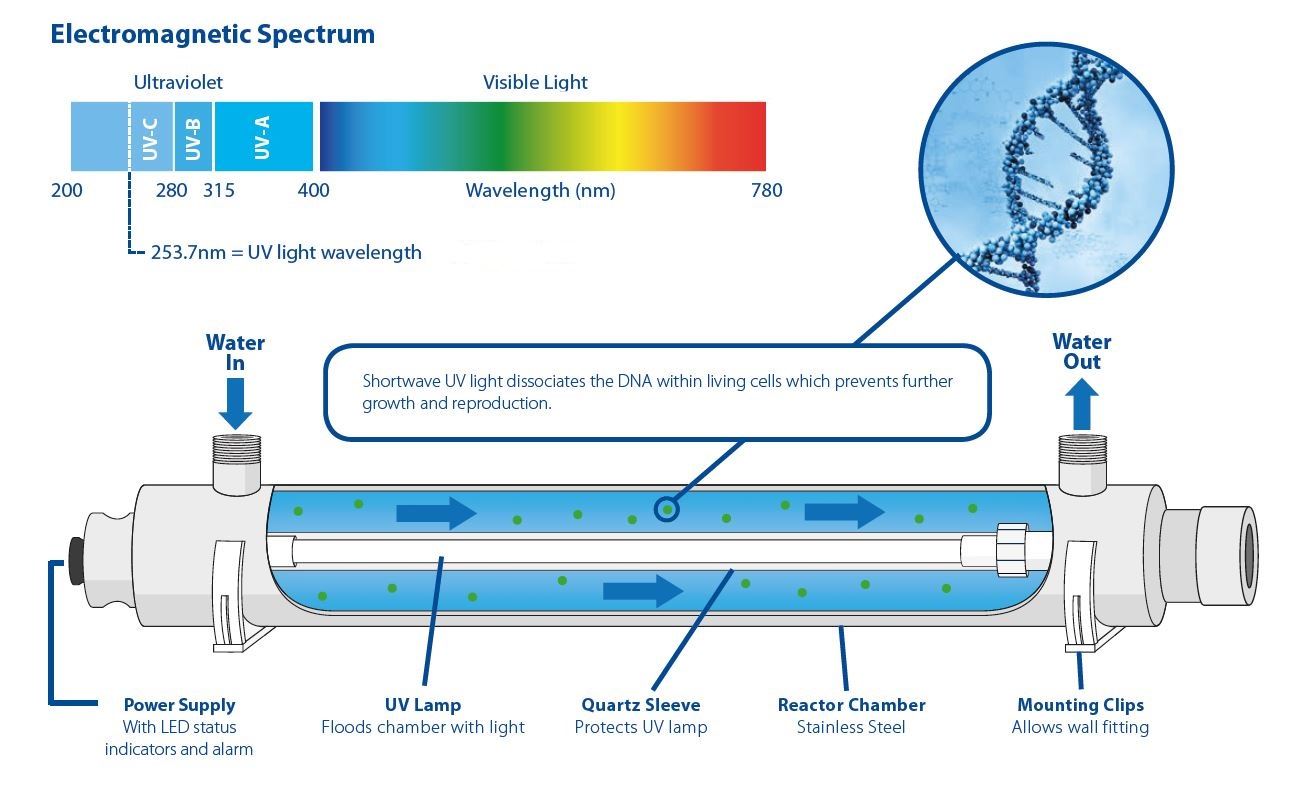
Ultraviolet light is a sophisticated disinfection solution, but it doesn't require an overly technical explanation. Light of a specific wavelength is passed through the water, inactivating any pathogens that are present. Because they are inactivated, microbes can no longer multiply, which means they cant cause infection
The below diagram outlines the basic features of an UV Disinfection System
There are a few factors to consider when choosing a suitable UV disinfection system for your project. Below we have outlines just a few areas that are important to get correct.
Flow Rate Calculations
When selecting a UV system, it is very important to know what the Maximum Water Flow is required to be treated. In many applications for healthcare and dental, this can be calculated from the equipment specification.
When sizing a UV for a aged care facililty or dwelling, the maximum flow rate can be calculated by multiplying the amount of taps that may be required to run at one time. Follow this link for a list of Water Usage By Industry Chart
UV Systems can be plumbed in parallel configuration to achieve high flow rates.
UV Dose Rate
UV dosage rates are as important as they must be high enough to kill the bacteria or pathogens you are targeting. Many general bacteria and parasites such as giardia and cryptosporidium, commonly found in rainwater supplies, only require relatively low dose rates.
Every UV system on the market is required to have a Dosage Chart which helps to calculate the maximum flow rate achieved for a particular UV Dosage.
Note: Many Dosage Charts will express dose rates based on excellent water qualities. You may have to 'upsize" a UV system to achieve adequate disinfection on some water supplies.
UV dosage rates are expressed in a mJ/cm2 format. Some common Target UV Dosage Rates referred to in UV technology include:
Beware of oversized System Connections
Take note, many UV manufacturers will equip steriliser reactor chambers with oversized inlet and outlet ports. Never assume a systems capability solely from the port size of the system as this often does not reflect the disinfection or hydraulic capacity of the system.
As a safeguard, always check the specification sheet for details on Maximum Flow and, in particular, the UV Dose Rate Chart.
For the best results and minimal maintenance, UV systems do require some pre-treatment. At the least, this includes a sediment filter, which is often included in newer, higher quality systems.
UV systems rely on UV-C rays of light coming in contact with water molecules as they pass through the reactor chamber. Without filtration, particlulate in the water supply 'shaddows' some pathogens and bacteria, preventing them from proper inactivation.
To ensure ongoing disinfection and longevity, UV systems require periodic maintenance. While this is quite simple to perform, her are a few basic steps to follow and some tips that may assist you for the first time.
The quartz sleeve is normally located through the centre of the UV reactor chamber. This clear 'glass' tube is sealed to the chamber by means of an O-ring and compression nut located on the end of the chamber.
Scale and dirt deposits can build up on the quartz sleeve and prevent the UV rays from shining through the water, in turn, reducing the effectiveness of the system.
Equipment required: A clean cotton cloth or rag, CLR (Calicum, Lime & Rust Remover - Normally found at Bunnings) and replacement O-rings - in case one is perished.
Look out for future updates and instructions, thanks for reading...


